(This post originally appeared on my other blog, WitchCrafty.biz!)
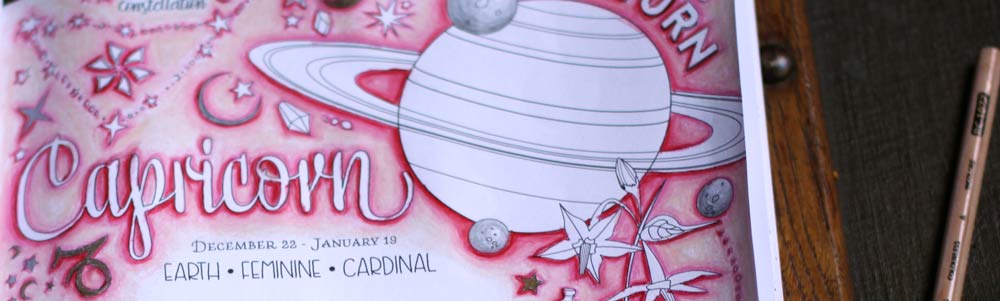
 If you’ve got the Coloring Book of Shadows and haven’t colored the Capricorn page yet… get in on the fun and color along with this tutorial.
For this Spacey Glowing Background, You’ll Need:
4 colored pencils, light-to-dark shades of the same color.
I used Prismacolor Premier:
- Blush Pink
- Pink
- Carmine Red
- Crimson Red
1 colored pencil of extra-extra-light cream, beige, grey, or light yellow.
I used Prismacolor Premier:
- Light Peach
Extra pieces of paper to put behind the page you’re working on
Note: I used pink/red, but feel free to use 4 shades of any color you want. It’s your creation!
Step 1: Darken the Bottom-Left Sides

To get this cool glowing shadowy effect, we’re going to position our “sun” or light to the top-right. What does that mean? That our shadows will be OPPOSITE of this sun — on the bottom-left.
- Keep this in mind when you’re coloring and if you’re in doubt about where the shadow falls. Find the bottom-left of the object and put the shadows there.
- Put a couple sheets of paper under the page you’re working on to protect the next page of the book.
- Using Carmine Red or your 2nd darkest pencil, outline the background on the BOTTOM-LEFT side only. See how I did it above? This doesn’t have to be perfect. Start slow and just do it as best you can. If it’s the bottom or the left-side of the object… outline it.
- DON’T outline the top or right sides of the things yet!! We’re only doing bottom and left. See how the top and right side of things are not outline yet in the above pic?
- Keep in mind not to go all the way around objects that overlap. This “glow” is only on the background, the “outer space” around the objects.
Step 2: Outline the Top-Right of Things with a Lighter Shade

- Next, use your 2nd lightest pencil of the 4. Mine here is PINK Prismacolor.
- Outline the opposite side of what we did above — so the TOP and RIGHT sides of things.
- See above, the bottom-left are the darker Carmine red, the top and right sides are now in a slightly lighter shade, pink.
Step 3: Blend with the Lightest Shade

- Grab your lightest of the 4, in my example that’s BLUSH PINK. Blend out what you’ve already outlined. So you’ll use this lighter shade to blend both the Carmine red on the bottom-left, and the Pink on the top-right.
- Use the Blush Pink to blend it out and bring the expand glow out from the object a little bit.
- Use PINK to further blend any spots between the CARMINE and BLUSH that need a bit of a 3rd color between them.
- Note above that my coloring is NOT perfect, but it’s still pretty cool! Just do your best and have fun.
Step 4: Deepen the Shadows

- Once you’ve got a pretty good blend with the 3 steps above, darken the shadows even more with your darkest of the 4 pencils.
- Don’t worry if it’s still a little rough because you’ll go over it with the colorless blender pencil at the end.
- With your very darkest pencil, in this example, the CRIMSON Red, go back on the BOTTOM-LEFT of things only and add a bit more shadow and darkness over the Carmine red you did in Step 1. Put it right up next to the objects.
- Don’t go crazy, just add some darker shadows on the BOTTOM-LEFT to intensify the glow and really add some contrast to the shadow. Where do you think the shadows would be darkest? Add a little Crimson Red there.
- If you feel necessary, use more of the 3 lighter colors while you’re at it to get a good blend and “glow” coming out from the objects.

Your page should look something like this, above, at this point! See how the darkest shadows are on the bottom-left and the glow fades out somewhat evenly from the objects?
STEP 5: Blend to White with a Super Light-Colored Pencil

- Using the lightest peach or beige you have (or another super light color that you think will blend your colors to white) – blend everything out even further.
- I used LIGHT PEACH here from the prismacolor set. See how this pic above compares to the previous one… the peach brings the glow out to a nice fuzzy blend with the white and fills in all the little spaces left between objects.
STEP 6: Use the Colorless Blender Pencil to Smooth It Out
- This is a super important step, so if your pencil looks a little rough at this point don’t worry — you’ll blend it all smooth now.
- With a colorless blender pencil, starting at the darkest colors and blending back out over the glow, blend.
- Blend, blend, blend.
- Don’t worry about being too precise, but use this stage to fix any imperfections or little spots that didn’t get colored. The blender pencil will push the color around and smooth it in. Blend over all of the colors together. You can go crazy here or just do a little bit to even it out — your call.
And — viola!
You’ve made a gorgeous glowing background and are ready to color the rest of the page.
…. I’ll be back with the next part of the Color-Along in a couple of days!

Sign up for new book announcements and free printable pages!

Get this Moon Magic set now!
... + more magical freebies & infrequent newsletters